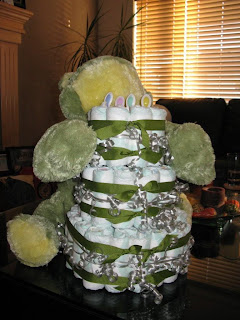
So I thought I would post the instructions that I use......
HOW TO MAKE A PROFESSIONAL DIAPER CAKE
Ingredients:
- I package of Brand Name Diapers (approx. 96)
- a round cardboard cake tray or round metal/aluminum pizza pan - this is the base
- scrap ribbon (approx. 4 yards)
- more ribbon for the cake itself
- hot glue gun
- goodies to decorate your cake based on color & theme
For a 3 tier cake with 96 diapers you will need:
- 48 diapers for the bottom layer
- 32 diapers for the middle layer
- 16 diapers for the top layer
To start, take your round tray and place something round and fat in the middle of your tray (this could be a tin of food or soup, a roll of toilet paper, etc.)
Starting with the bottom tier, we will use 48 diapers. Pick up three and space them in your hand, bottom part facing out to the left ~ do not open them up! Layer them slightly so they overlap ~ one, then the second one slightly to the right of it, and the third slightly to the right of the second one. Bend them slightly to give them a slight curve. Place them, on end, leaning
against your round object in the middle of your round tray. Add more diapers to the outside of your diapers~ you will be adding the diapers on top of each other in the round.
You should use 40 out of the 48 diapers in the outside layer. When you have all 40 diapers pinwheeled around your object...you now use a piece of your scrap ri
bbon to tie your diaper tier. Tie it snug with a bow ribbon, not a double knot, as you will want to remove this later.
You are left with a hole in the middle where your round object is...the other 8 diapers fan into that hole.
Repeat for 2nd layer using 28 diapers on the outside layer and 4 on the inside layer.
For the top tier, you will want 14 diapers on the outside layer, and 2 diapers in the middle inner layer.
Once all 3 layers are complete, go back and straighten out the diapers and double check to make sure your spacing is even & uniform. Your scrap ribbon is holding them securely so you should be able to pull & push them into place and make them even.
Now it is time to add YOUR ribbon. Without removing the scrap ribbon just yet, you will want to measure out the length you will need & add 2" inches to that to create a nice, clean edge.
-1.jpg)
Cut the ribbon & wrap it around the tier. This is when you will use your glue gun to glue the ribbon to the ribbon. (Careful not to get glue on diapers!) Wait until glue has cooled before carefully reaching behind the ribbon to remove the scrap ribbon.
One layer of thick ribbon is great, however more is very appealing! To add ribbon, you will want to glue the new layer directly to the first layer that you have secured on. Make sure it is straight & glued all the way around so that it does not slip. Use a smaller width of ribbon for the second layer of ribbon you are attaching.
- First layer of ribbon should be 2" inch width of floral ribbon
- Second layer of ribbon should be 1" inch width of floral ribbon
- Third layer can outline the top and bottom of the 1" width ribbon by using 1/16th grosgrain ribbon.
Decorate the cake with the goodies from the theme or color theme you chose. Attach objects to the cake with colorful diaper pins. Your imagination is your only limit!!!!
Other things to take into consideration:
- NEVER use tape, not only does it look bad but will damage the diapers.
- Use brand name diapers unless you know the parents are using store brand. What a shame if your cake isn't used the way it was intended to be used because the diapers weren't something the parents were confident in.
- Diapers ABSORB, very well ~ that is their purpose after all!!!! They absorb smells & fluids. Keep your completed cake in a dry location, away from dank smells (smoke, food, gases, etc.) Wrap in a cellophane bag if need be.
- Simple and elegant is better than busy and cheap!!! Use items you are proud to give the new family
- Have fun with your cake!!!! Make it something original that the recipients and guest will never forget!!!!


